Integration example 2: Package with External Database
This tutorial will guide you through an integration of an example package, that requires an external database and it is not referred to MAGs module.
What we need for this integration
Understand the Stream-level: in this case
Assembly-basedModule name:
assembly_func_annotationPackage name:
kofam_scanKnow which are the conda dependencies for this packages, or the conda package name.
Know the code to actual integrate and execute the package.
Step 1: Clone/fork the repository and install Geomosaic
Since the final strategy is to make a pull request to the main repository, we suggest to fork our repo and then clone it (in the SSH way)
git@github.com:<YOURNAME>/Geomosaic.git
Install the Geomosaic conda environment. You can follow the Installation Guide.
Remember to replace <YOURNAME> with your GitHub user account.
Once you have cloned the repository, open the directory created with the clone and also create another branch specifying the name of the package that you are going to integrate
git checkout -b kofam_scan
Step 2: Create the module folder (if does not exists)
In this example we are going to integrate a package that perform a functional annotation on Assembly-based starting from the predicted orf (as input). Therefore in this case, the module folder already exists, and we don’t need to do anything on this step.
Step 3: Create the package folder
We need to create the package folder inside the corresponding module, which in this case is assembly_func_annotation. Since we are going to integrate the program called KOfam Scan, we can create a folder called kofam_scan.
Warning
Do not use any special characters or insert spaces in the name.
Highlight
Just rely on underscore and all lower-case characters
Step 4: Create package’s snakefiles
Now we need to create the three files where we are going to implement all the necessary code:
Snakefile.smkSnakefile_target.smkparam.yaml
For now you can leave them empty.
Important
The names for this file are standard and are the same for each package. Do not change the filenames.
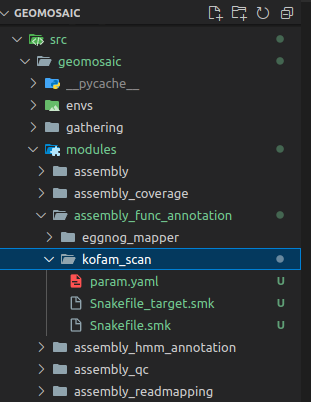
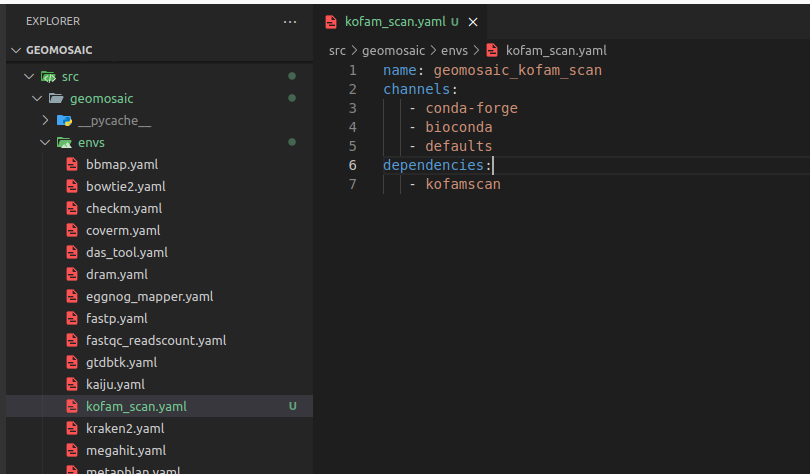
Step 5: create the corresponding conda env file
In this section we need to create the corresponding conda env file describing the necessary dependencies for our package. For this purpose, in the envs folder we create a file with the same name of the package (kofam_scan) (with the yaml extension). As content of the file we are going to write the necessary dependencies. In this case we are going to specify only KOfam Scan from the bioconda channel. The name of the conda environment is the name of the package with geomosaic_ as prefix.
Now we can write our code inside the Snakefile
Step 6: Link the module/package to the Geomosaic core
So in this section we need to link our new module and/or our new package to the already existing core of Geomosaic, which is represented by the file called gmpackages.json.
Let’s see how to do it.
Step 6.1: order section
We can skip the order section, since our module assembly_func_annotation already existed before this integration.
Step 6.2: graph section
Similarly, we can skip also this section since our module assembly_func_annotation already existed before this integration.
Important
If you want to understand what really means a dependency in Geomosaic, you can read this Modules Dependencies description.
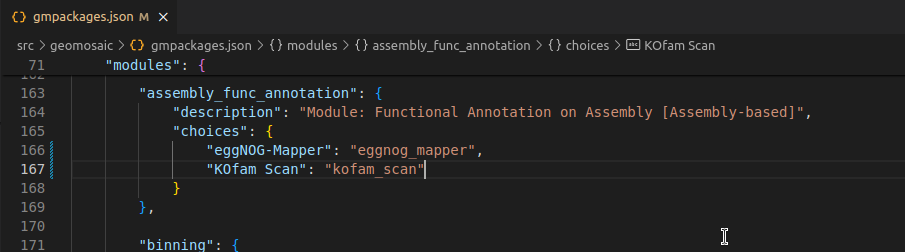
Step 6.3: modules section
In the corresponding modules section, we need to add the name of our package in our choices, which is a dictionary containing all the packages belonging to that module.
In particolar, the key (the blu string in the image) is the string that will come out in the terminal as a choice, during the workflow decision, while the value (in orange) is the actual name of the package, the one that we used also to create the folder in step 3.
Important
Package name on the value must match with the folder created in the step 3
Step 6.4: additional_input section
If the package does require any additional input, you can integrate this input in the corresponding section of additional_input. In this case we don’t need to put any additional argument.
Highlight
Additional arguments are parameters that are widely known in the metagenomic workflow and that should be chosen by the user, as for example Completeness and Contamination.
In this section we have inserted also the possibility to specificy a folder that contains HMM models (for assembly_hmm_annotation and mags_hmm_annotation), as well as the name of the output folder these two modules in order to have different output name folder for different sets of HMMs.
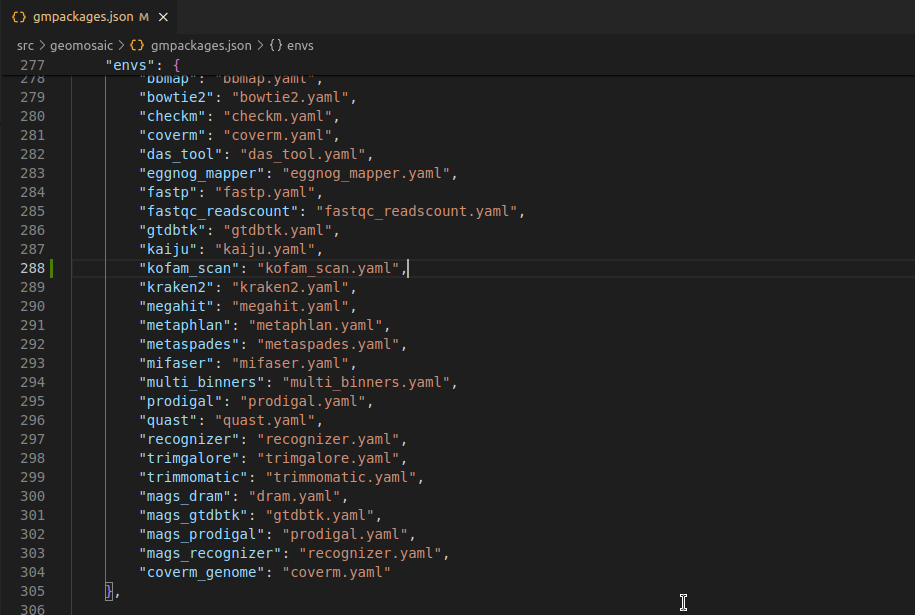
Step 6.5: envs section
This section is very simple, we only need to add the conda env file for our package that we have created in the Step 5. This filename must have the same package name. In this case kofam_scan.
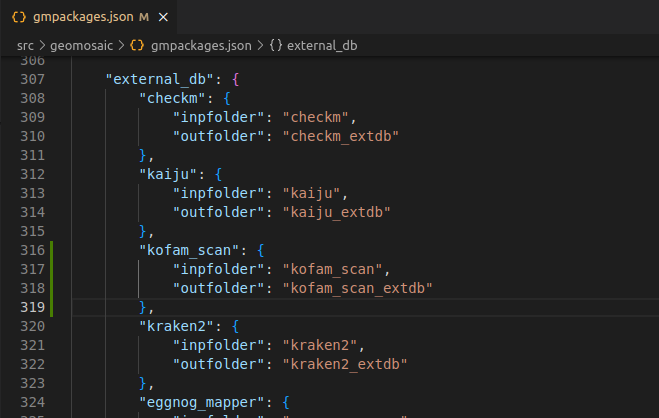
Step 6.6: external_db section
This section is useful to organize external databases for the package that we are going to integrate. In this example, we need an external database (extdb).
In this section:
each package that requires an extdb has a key which contains two other keys:
inpfolder: its value should be the name of the packageoutfolder: must be the name of the folder in which the external databases is going to be downloaded. The pattern is: the name of the package followed by the_extdbsuffix.
Highlight
In some cases, the same tool can be integrated at multiple levels, such as assembly-based and binning-based, as it was for the recognizer package and mags_recognizer. It is important to note that both integrations rely on the same external database. Therefore, in this section, we specify the same inpfolder and outfolder.
See also section 7.3 Bis.
So in this section we are going to write as follows:
Step 6.7: gathering section
This section is not mandatory. However it is useful if we want to compose some master tables or plots from the results of our package from all the samples computation. In this case, we are not interest in this section. However we could create a script that creates a table of all the reads count for each sample.
At the time of writing, this is the last section in the gmpackages.json.
Step 7: How to organize the code for the External Database (extdb).
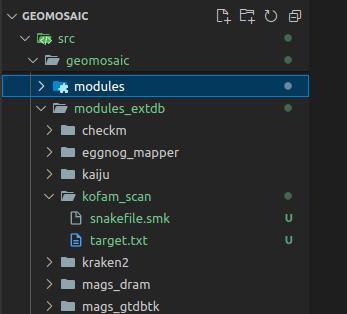
Step 7.1: Create a folder for our package
First we need to create a folder for our package inside the folder called modules_extdb. The folder must have the same name of our package; in this case kofam_scan.
Step 7.2: Creation of code files
In this folder, we create two files named:
snakefile.smktarget.txt
Important
Do not change this filenames.
Step 7.3: Snakefile for extdb
The rule name in the snakefile.smk should be the name of the package with the _db suffix. In this file we are going to write all the code that we need to setup the external database for this package.
The output folder is the name of the package with the
_extdb_foldersuffix.
THe integration for the code of the extdb should be something like this
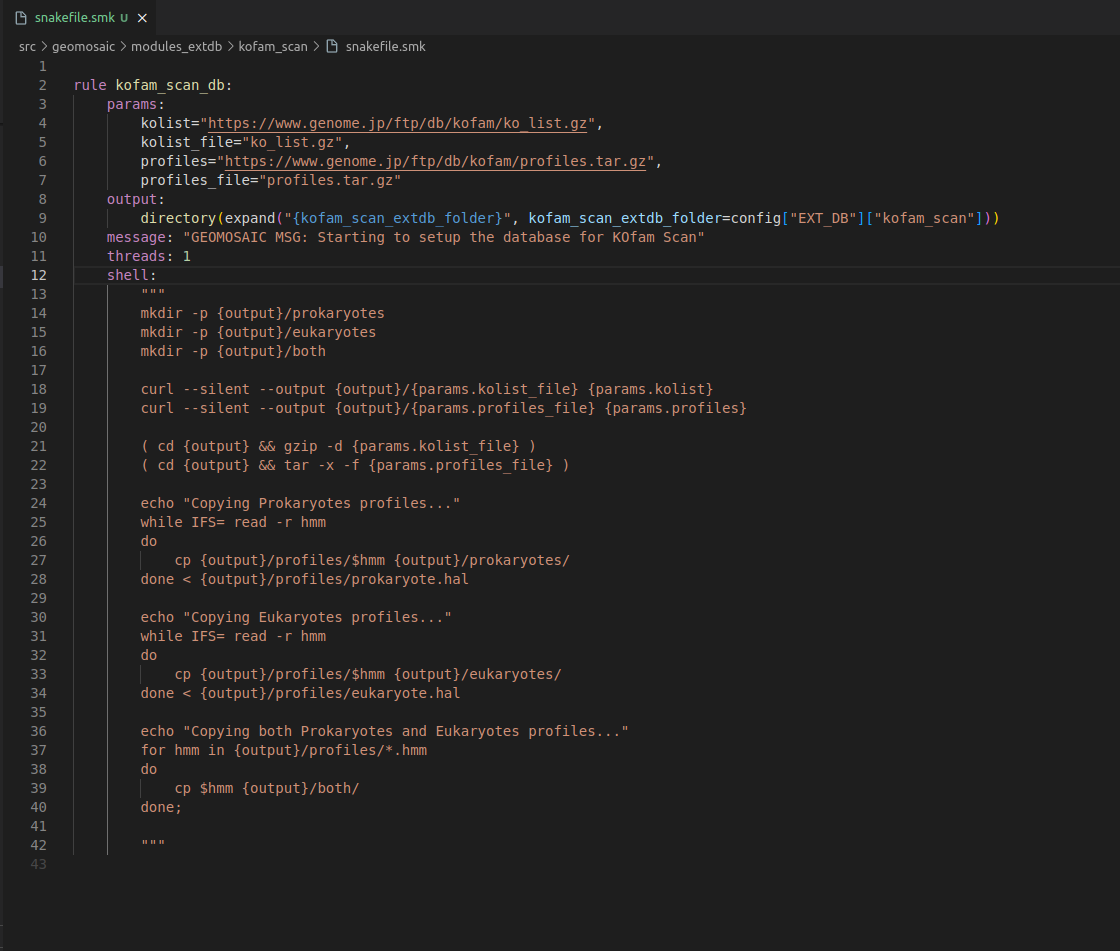
By default, we use just 1 thread for each package to perform the download of the corresponding extdb.
At the time of writing, only 9 packages requires extdb, therefore in the slurm_extdb template we have 9 cores, 1 core for each rule. I know is not optimized, but for now like this should be fine.
Step 7.3 bis: Snakefile for extdb using conda env
If the code that download the external database need a conda environment, you can specify it using the ENVS_EXTDB key for the config. The following image show how it should be written.
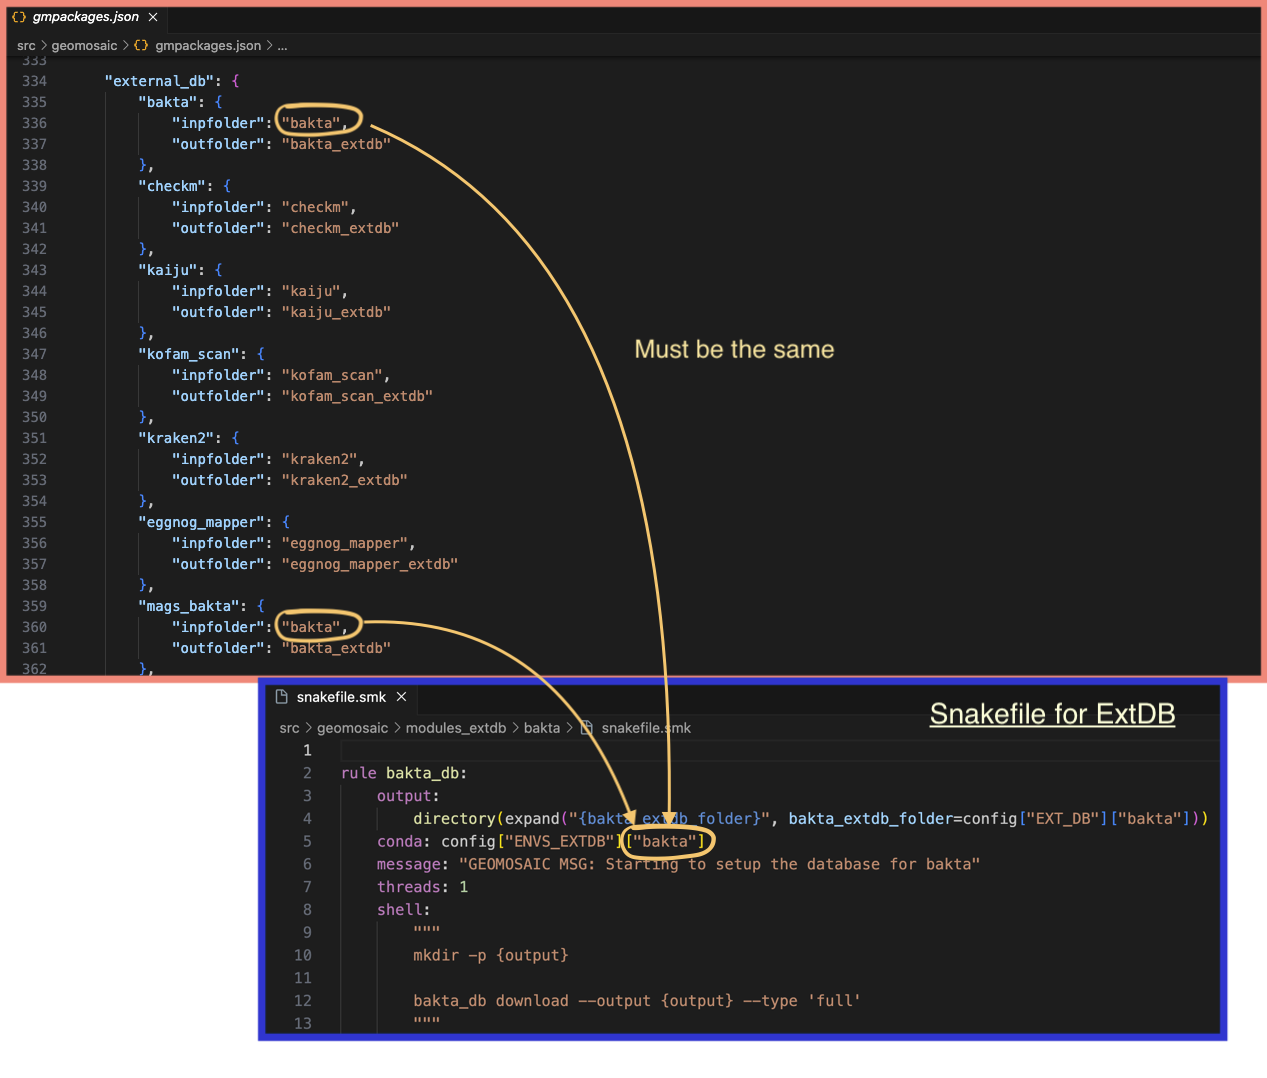
In the previous example, the tool bakta was integrated both for assembly-based and binning-based modules. However the values on the key external_db in the gmpackages.json are the same.
Step 7.4: Snakefile target for extdb
In the target.txt we only need to put the expand line in the output section (without directory function of snakemake). Remember the comma at the end of the line which is very important.

Now we can write our code inside the Snakefile.
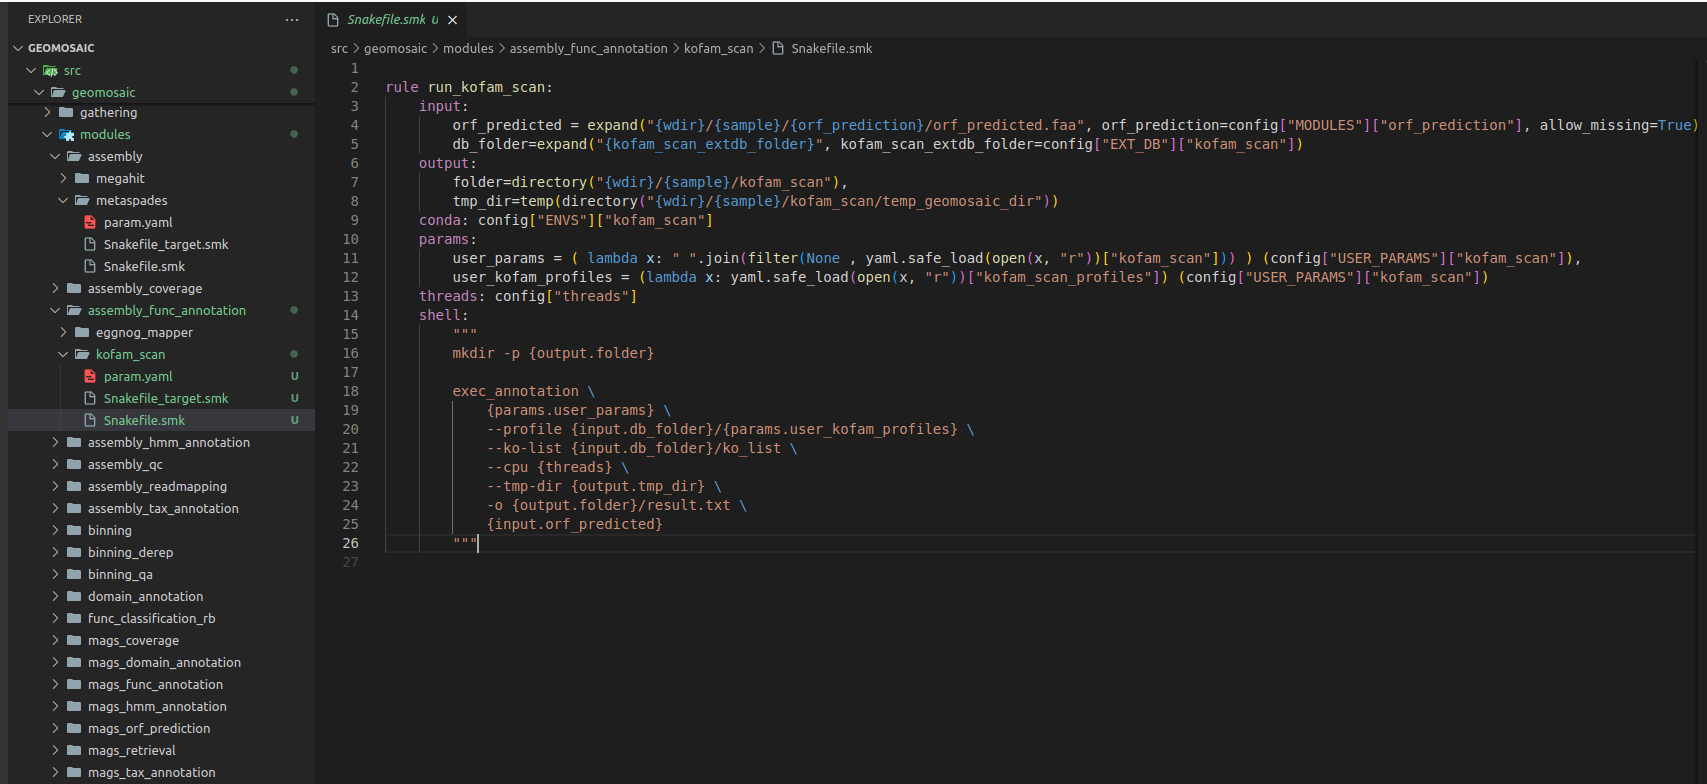
Step 8: Write the actual code.
For this package the code is very easy. Since it uses only the predicted orf, we can use the template of the eggnog mapper. We copy paste the code inside the Snakefile.smk of metaspades and then modify it.
Step 8.1 Snakefile: input/output section
We need to change the rule definition with the package name, composed also of the prefix run_.
Our input section is fine, as we need only the predicted orf from the
orf_predictionmodule.In output section usually we put the folder output that must be the same of the package name. However if you know that your package is going to provide in output a specific file, you can even increase the detail of this section by inserting also that file.
Step 8.2 Snakefile: threads section
The threads section is fine like this. If we know that is not possible to execute our package through parallelization we can put in this section 1, otherwise we can leave it as it is.
Step 8.3 Snakefile: conda section
In this section, we only need to put our package name.
Step 8.4 Snakefile: params section
In each package we put at least a param variable called user_params, which is going to read the param.yaml file that we have created in the Step 4. The code to read user parameters, is almost always the same (so you don’t need to modify it):
user_params=( lambda x: " ".join(filter(None , yaml.safe_load(open(x, "r"))["kofam_scan"])) ) (config["USER_PARAMS"]["kofam_scan"])
Just replace kofam_scan with your package name.
Since this package accept a profile database for the annotation, we have inserted another param called kofam_scan_profiles (Section 10) that is read by the following line
user_kofam_profiles = (lambda x: yaml.safe_load(open(x, "r"))["kofam_scan_profiles"]) (config["USER_PARAMS"]["kofam_scan"])
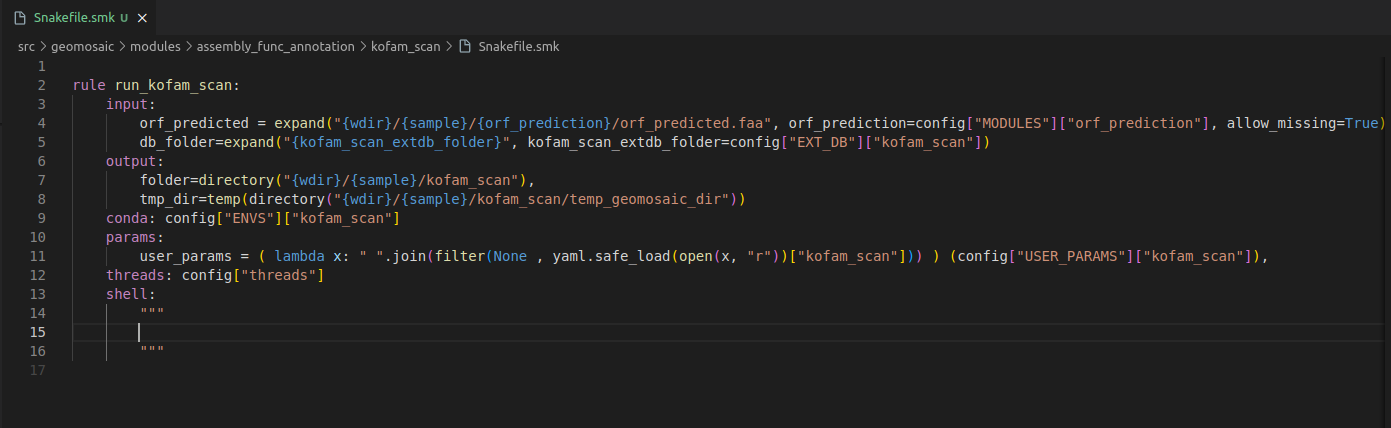
Step 8.5 Snakefile: shell section
This is the section in which we are going to put the actual code to execute our programs.
Step 9: Snakefile Target
In our file Snakefile_target.smk we only need to write few rows. First, the name of the rule must be the same name of the package name with the all_ prefix. And then we need to change the rows in the input section, and we need to specify the same folder output as in this case was our only output that we specified in the Snakefile.smk.

Step 10: Param.yaml file
The param.yaml is a file in which the user, before the execution of the workflow, can insert all the optional parameters belonging to the package as bullet points. In this case, we only need to open this file and add the following lines:
kofam_scan:
- --format detail-tsv
-

# Allowed profiles are: prokaryotes, eukaryotes, both. Default: prokaryotes
kofam_scan_profiles: prokaryotes
Test the integration
Now we should test the integrated package. Activate the conda environment of geomosaic. Updated geomosaic by doing
pip install .
Once we have tested, we can commit the changes and create the pull request.